Wood-Frame House Construction
Step-by-step construction details, from the layout of the outer walls, excavation and formwork, to finish carpentry and painting. Contains all new, clear illustrations and explanations updated for construction in the '90s. Everything you need to know about framing, roofing, siding, interior finishings, floor covering and stairs – your complete book of wood-frame homebuilding.
Step-by-step construction details, from the layout of the outer walls, excavation and formwork, to finish carpentry and painting. Contains all new, clear illustrations and explanations updated for construction in the '90s. Everything you need to know about framing, roofing, siding, interior finishings, floor covering and stairs – your complete book of wood-frame homebuilding.
| Weight | 1.620000 |
|---|---|
| ISBN | 0-934041-74-1 |
| Page Count | 320 |
| Author | L.O. Anderson |
| Publisher | Craftsman Book Company |
| Dimensions | 8-1/2 x 11 |
1 Location & Excavation, 5
- Conditions at the Building Site, 6
- Placement of the House, 6
- Excavation of Foundations & Basements, 8
2 Concrete & Masonry, 11
- Mixing & Pouring Concrete, 11
- Footings, 12
- Drain Tile & Drainpipe, 14
3 Foundation Walls & Piers, 15
- Poured Concrete Walls, 15
- Concrete Block Walls, 16
- Masonry Construction for Crawl Spaces, 18
- Reinforcing in Poured Walls, 20
- Masonry Veneer Over Frame Walls, 22
- Notch for Wood Beams, 23
- Protection Against Termites, 24
4 Concrete Floor Slabs on Ground, 25
- Combined Slab & Foundation, 26
- Concrete Floor Slabs and Insulation, 27
- Insulation of Foundation Walls & Slabs, 29
5 Floor Framing, 31
- Posts and Girders, 31
- Girder-Joist Installation, 35
- Cripple Walls, 37
- Floor Joists, 39
- Subfloor, 41
- Framing at Wall Projections or Cantilever, 42
6 Wall Framing, 43
- Western Platform Wall Construction, 44
- Balloon or Rake Wall Construction, 48
- Window, Door & End-wall Framing, 50
- Interior Walls, 51
7 Ceiling & Roof Framing, 53
- Flush Ceiling Framing, 53
- Post & Beam Framing, 54
- Roof Slopes, 57
- Flat Roofs, 58
- Pitched Roofs, 59
- Valleys, Dormers and Skylights, 61
- Overhangs or Second Story Cantilevers, 63
- Lightweight Wood Roof Trusses, 64
8 Wall Sheathing, 69
- Structural Insulating Board Sheathing, 71
- Corner Bracing & Shear Panel, 73
- Installing Sheathing, 74
9 Roof Sheathing, 77
- Plank & Fiberboard Roof Decking, 79
- Sheathing at Chimneys, Valleys and Hips . 80
10 Exterior Trim for
- Cornices & Eaves, 83
- Cornice Construction, 84
- Rake or Gable-end Finish, 87
11 Roof Coverings, 93
- Wood Shingles, 94
- Asphalt Composition Shingles, 96
- Built-up Roofs, 99
- Clay & Concrete Tile, 100
12 Exterior Frames
- Windows & Doors, 103
- Double-hung Windows, 104
- Casement Windows, 106
- Stationary Windows, 107
- Awning, Hopper & Sliding Windows, 108
- Exterior Doors & Frames, 109
13 Exterior Coverings, 113
- Wood Siding, 113
- Sheet Materials, Wood Shingles & Shakes, 116
- Installing Siding, 117
- Installing Wood Shingles & Shakes, 124
- Non-wood Coverings, 126
14 Framing for Plumbing & Heating, 127
- Bathtub Framing, 128
- Cutting Floor Joists, 128
- Alterations for Heating Ducts, 130
- Wiring, 131
15 Thermal Insulation & Vapor Barriers, 133
- Types of Insulation, 136
- Where to Insulate, 138
- How to Install Insulation, 139
- Vapor Barriers, 141
16 Ventilation, 143
- Area of Ventilators, 144
- Gable Roofs, 144
- Hip & Flat Roofs, 146
- Types and Location of Ventilators, 147
- Crawl-Space Ventilation and Soil Cover, 149
17 Sound Insulation, 151
- Wall Construction, 152
- Floor-Ceiling Construction, 154
- Sound Absorption, 156
18 Basement Rooms, 157
- Floors, 157
- Walls, 158
- Ceilings, 160
19 Interior Wall & Ceiling Finish, 163
- Lath and Plaster, 163
- Drywall Finishes, 168
- Ceramic Tile, 172
20 Floor Coverings, 175
- Carpeting, 175
- Wood Strip Flooring, 176
- Wood Block or Parquet Flooring, 180
- Resilient Floors, 182
- Ceramic Tile, 184
21 Interior Doors, Frames & Trim, 185
- Door Frame and Trim Installation, 188
- Installing Door Hardware, 190
- Wood Prim Installation, 192
- Decorative Treatment, 195
22 Casework & Other Millwork, 197
- Kitchen Cabinets, 197
- Miscellaneous Casework, 201
23 Stairs, 204
- Rough Framed & Basement Stairs, 206
- Main Stairway, 208
- Circular Stairs, 210
- Attic Folding & Exterior Stairs, 215
24 A Caulking & Flashing, 217
- Flashing, 217
- Gutters and Downspouts, 223
25 Adding a Porch or Garage, 227
- Porches, 227
- Decks, 231
- Garages, 231
26 Chimneys& Fireplaces Masonry & Metal, 235
- Chimneys, 235
- Flue Linings, 237
- Fireplaces, 238
27 Driveways, Walks & Basement Floors, 243
- Driveways, 243
- Sidewalks, 244
- Basement Floors, 246
28 Painting & Finishing, 247
- Finishes for Exterior Wood, 249
- Finishes for Interior Woodwork, 252
- Finishes for Floors, 253
- Painting Plaster and Drywall Finishes, 254
29 Protection Against Decay & Termites, 255
- Decay, 255
- Water Vapor and Termites, 258
30 Protection Against Fire, 261
- Chimney and Fireplace Construction, 263
- Heating Systems, 264
- Fire-resistant Construction, 264
31 How to Reduce Building Costs, 265
- Design, 265
- Choice of Materials, 266
32 Protection& Care of Material on Site, 269
- Protection Requirements, 269
- Finishing the Interior, 270
33 Maintenance and Repair, 273
- Basements, 273
- Crawl-Space Areas, Roofs and Attics, 274
- Exterior Walls, 275
34 Estimating Construction Costs, 279
- Good Estimating Starts with the Plans, 280
- Excavation and Sitework, 281
- The Concrete Estimate, 283
- The Wood-Frame Estimate, 289
- Getting Quotes from Qualified Bidders, 292
- Contingency, Overhead and Profit, 293
Glossary, 295
Index, 306
Chapter One
Location & Excavation
This book will explain how wood-frame houses are built. It will describe the procedures and materials used to build good quality, attractive, and affordable homes. If you're just getting started in the construction trades, this manual will probably be the most useful and most concise guide you'll find on home building. Maybe that's why previous editions of this guide have been widely used in apprentice training programs and trade schools. But this isn't a textbook. It's a practical guide that even experienced tradesmen and builders will find useful and want to keep handy.
First, understand that you don't have to apologize when you build a conventional wood-frame home. Houses with lumber studs and rafters may be cheaper than houses made from concrete, brick, or block. But wood-frame houses aren't inferior. Under proper conditions, wood houses will last many years. Timber-framed buildings more than 200 years old are still in use today. Many communities in New England can count scores of wood-frame homes over 100 years old. The modern conventional wood-frame house is economical, long-lasting, and can be built nearly anywhere.
It's true that masonry, concrete, and even stone are the most common building materials in many nations of the world. But the U.S. is blessed with abundant forests that make lumber a relatively inexpensive building material that's readily available nearly everywhere. This makes lumber the material of choice for the vast majority of U.S. builders and designers.
However, building durable, economical wood-frame houses isn't a simple task. You have to follow good construction procedures and select the right materials. That's why this book was written. Consider the four essentials of every good quality home:
1) An efficient plan
2) The right material
3) Sound construction
4) Energy efficiency
The house you plan to build may be large or small, fancy or simple, modern or traditional. But if you skip any of these essentials, the home isn't likely to be either desirable or durable. Designing and planning are beyond the scope of this book. Instead, this manual will concentrate on the materials and construction practices likely to produce a home that is desirable and durable.
Of course, construction details and codes vary. But the fundamental principles are the same. This handbook deals with well-established methods of construction that comply with nearly any building code. The large, easy-to-understand illustrations in this book supplement the text so you can master the essential points quickly and efficiently.
In general, this book follows the sequence of construction - from pulling permits, to foundation, to finish work. The final chapters cover painting, protecting wood from decay and fire, and upkeep. A glossary of building terminology is included at the back of the book to help you with terms you're not familiar with. New terms you see in italics are in the glossary.
Conditions at the Building Site
Before excavating for any new home, find out about the subsoil conditions by test borings, talking with local building officials, or by checking houses already built near the site. Moving subsurface rock or correcting unsuitable soil conditions can be very expensive. If there's a high water table, avoid a full basement. Instead, build the house over a crawl space, or on a concrete slab.
If the area has been filled, you may have to extend the footings through to undisturbed soil. You may need a soils compaction report. Any time you have to correct for undesirable soil conditions, the cost and risk of failure of the foundation and footings will go up. Ask about the type of foundation used on other homes in the neighborhood. This will help determine the best type of foundation for the home you're building.
If you have to excavate on the site to prepare for construction, you may need a separate grading permit from the local building department. You'll probably have to submit a grading plan that shows existing grades, finish grades, and the location and direction of drainage on the site. After building officials inspect the site and approve the soils report, you can begin construction. If you have to move a lot of soil on the site, have a registered civil engineer prepare the grading plan and supervise the soils testing.
Placement of the House
Think about zoning setbacks, view, convenience, orientation to the sun, and prevailing winds when orienting the house on the site. While view and convenience are personal preferences and beyond the scope of this book, zoning and orientation can affect the future quality and value of the home.
You'll apply for the building permit at the local building department office. While this application is being processed, the local officials will decide if your plans follow the local zoning ordinances. Generally, the size of a house can't be more than 40 percent of the lot size, and it must be set back from the property line a minimum distance. In most towns this distance is 20 feet in the front and back, and 5 to 10 feet on the sides. Some communities require that the plans be approved by an architectural review committee before you begin construction.
Keep energy conservation in mind when orienting the home on the site. Windows that face south and west admit a lot of heat on a sunny afternoon. This increases the cooling load in warm climates during summer and fall. But in the winter, south-facing windows may save energy. This book isn't intended to cover designing energy-efficient homes, but it will identify ways to save energy when designing and building a modern wood- frame house.
When the site is cleared and ready for construction, the first step should be locating the property boundaries. If you're not sure about the location of the property lines, have a surveyor mark the corners of the lot. Even experienced builders have accidentally built on a neighbor's land. Also, have the surveyor roughly mark the corners of the proposed house so it meets zoning setback requirements.
Next, set up lines and grades to help you keep the work level and true. The normal method used to locate and save the outline of the house is to build batterboards, as shown in Figure 1-1. The height of the boards also sets the level or grade of the foundation wall or the top of the concrete slab.
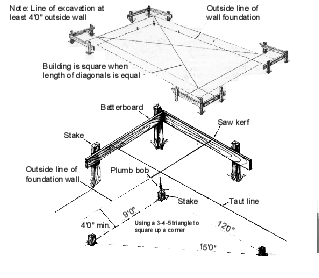
Figure 1-1
Laying out the House
At each corner of the house, as accurately as possible, place small stakes with nails driven in their tops to indicate the outside line of the foundation walls. To make sure the corners are square, measure the diagonals formed between opposite corners of the house. If the diagonals are equal in length, the layout is square. You can also square a corner by using the 3-4-5 triangle method:
1) From a corner, measure along one side in 3-foot units such as 6, 9, or 12.
2) From the same corner, measure along the adjoining side in 4-foot units such as
8, 12, or 16.3) Measure the diagonal distance from the ends of the sides measured in steps 1
and 2.
If the corner is square, the diagonal will be the equal of 5-foot units such as 10, 15, or 20. So a 9-foot distance on one side and a 12-foot distance on the other should have a 15-foot diagonal. If so, it's a true 90-degree corner.
After you locate the corners, drive three 2 x 4-inch wooden stakes of suitable length at least 4 feet beyond the lines of the foundation (Figure 1-1). Then nail 1 x 6-inch boards horizontally, so the tops are all level to the same grade. Next, run string or nylon line across the top of opposite boards at two corners and adjust it so that it's exactly over the nails in the corner stakes at either end. Use a plumb bob to help you set the lines. Saw kerfs at the outside edge where the lines touch the boards, so you can replace them if they get broken or disturbed.
After you've put similar cuts in all eight batterboards, the lines of the house will be set. Check the diagonals again to make sure the corners are square. An "L" shaped house plan, for example, can be divided into rectangles which can be treated separately, or as extensions of one or more sides.
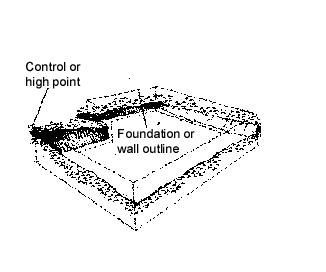
Figure 1-2
Establishing Depth of Excavation
Height of Foundation Walls
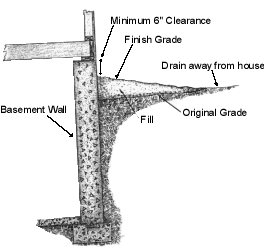
On ungraded or graded sites, it's common practice to set the depth of the excavation, and the height of the foundation, using the highest elevation just outside the excavation as the control point (Figure 1-2). This method will give good drainage if you allow enough foundation height for the slope of the final grade (Figure 1-3). You should make foundation walls at least 74" high for full basements, but 8-foot walls are most common.
Be sure the foundation walls extend well above the finished grade around the entire perimeter of the house. This helps protect wood siding and framing from moisture in the soil. It also helps keep termites out of the wood in termite-infested areas. Termites live in the soil but feed on wood. Where wood is in contact with the soil, they have no trouble attacking the wood. If wood and soil are separated by at least a few inches, they have to build mud tubes along the foundation between soil and the wood. These tubes are obvious and can be destroyed easily before the termites do serious damage.
Be sure to leave enough clear height in crawl spaces (18 inches at a minimum) so access is possible. The owner may want to inspect for termites or install a soil cover to keep moisture out of the floor framing. Good access in the crawl space nearly guarantees adequate air circulation.
Most building codes say that the top of the foundation wall must be at least 6 inches above the finish grade at the wall line. The finish grade at the building line might be 4 to 12 inches or more above the original ground level. In lots sloping upward from front to rear (Figure 1-3), this distance may be 12 inches or more. On lots with a steeper slope, you may need a retaining wall at the back of the house.
For a house with a crawl space, the distance between the ground level and the underside of regular wood joists should be at least 18 inches above the highest point within the area enclosed by the foundation wall. If any clearance is less than 18 inches, you can use wood joists that are pressure-treated with preservatives to prevent dry rot and insect attack.
Where the ground level within the perimeter of the foundation is below the ground level outside the foundation, you have to provide drainage to the exterior, either by gravity drain or with a pump.
Figure 1-3
Finish Grade Sloped for Drainage
Excavation of Foundations & Basements
Front-end loaders, backhoes, and several other types of earthmoving equipment are used to excavate basements. Stockpile topsoil for future use with a bulldozer or front-end loader. Use a power trencher to excavate for foundation walls and footings if the house is being built on a slab or with a crawl space. If the soil is stable enough to prevent caving-in, no foundation forms will be needed below the natural grade level.
It's better to delay the last few inches of excavation until you're ready to pour the concrete. For example, excavate only to the top of the footings or the bottom of the basement floor when doing the initial excavation. Some types of soil get soft and expand when exposed to air or water. That makes them a poor material for forming concrete. If possible, especially in regions with high moisture, pour concrete on undisturbed soil that has been exposed for no more than a day or two.
Be sure the excavation is wide enough to give you space to work when constructing and waterproofing the walls. If you're building in a poor drainage area, you'll need this space for laying drain tile. See Figure 1-4. Maximum safe slope of the trench wall is determined by the type of soil. With clay or other stable soil, the back slope can be nearly vertical. If you're in sandy soil, use an inclined slope to prevent caving-in or subsidence.
When excavating for basements, some contractors stake out only the approximate perimeter of the building. When excavation is nearing completion, they lay out the exact floor elevation and location of footings. Then they complete the excavation. After the concrete is poured and set, they establish the building wall outline on the footings and mark them for the formwork for foundation walls or concrete block walls.
This manual is the basic reference for anyone building or remodeling wood-frame
houses. It has the practical information on modern building materials and
methods that every builder needs to do professional-quality work.
From the layout, excavation and formwork, through finish carpentry, sheet metal and painting, every step of construction is covered in detail, with clear illustrations and step-by-step instructions. Here you'll find everything you need to know about framing, roofing, siding, insulation and vapor barriers, interior finishing, floor coverings, millwork and cabinets, stairs, chimneys, driveways, walks . . . complete "how-to" information on everything that goes into building a wood-frame house.
Many valuable tips are included:
-
What you should know about building codes o Ways to cut costs without cutting quality
-
How to use reinforcing properly
-
Framing hardware applications o Manufactured beams & joists
-
Fire & safety considerations
A special section on estimating, with the building process laid out as a flow chart, will help you plan all the steps in residential construction, and to estimate each one quickly and accurately.
This completely rewritten edition of this very popular book gives clear, concise instructions on time-proven construction as well as the modern building techniques and materials developed in the 1980s and 1990s.

