
The Complete Book of Home Inspection, 3rd Edition
This comprehensive manual covers every aspect of home inspection, from the tools required to inspecting roofs, roof mounted structures and paved areas around the structure, walls, windows and doors, landscaping, garages, wood-destroying insects and rot; attics, interior rooms, basements and crawl spaces; electrical, plumbing and HVAC systems; swimming pools; energy considerations; and environmental concerns such as radon and mold.
Includes hundreds of photos and illustrations to help you understand, check, and identify potential problems.
| Weight | 2.000000 |
|---|---|
| ISBN | 0-07-139125-8 |
| Page Count | 290 |
| Author | Norman Becker, P.E. |
| Publisher | McGraw Hill |
| Dimensions | 8 x 10 |
| Contents | ||
| Introduction, xii | ||
| 1 | Tools and procedure, 1 | |
| Tools needed, 1 | ||
| Inspection procedure, 2 | ||
| Exterior inspection, 2 | ||
| Interior inspection, 3 | ||
| Electromechanical systems, 4 | ||
| Final inspection, 4 | ||
| EXTERIOR INSPECTION | ||
| 2 | Roofs, 6 | |
| Pitched roofs, 6 | ||
| Shingles, 8 | ||
| Flat roofs, 14 | ||
| Built-up roofs (BURs), 16 | ||
| Single-ply membrane, 17 | ||
| Roll roofing, 17 | ||
| Metal roofing, 17 | ||
| Checkpoint summary, 18 | ||
| 3 | Roof-mounted structures and projections, 19 | |
| Chimneys, 19 | ||
| Vent stacks, 22 | ||
| Roof vents, 24 | ||
| Roof hatch, 24 | ||
| Skylights, 25 | ||
| TV antennas, 25 | ||
| Lightning protection, 25 | ||
| Gutters and downspouts, 26 | ||
| Built-in gutters, 26 | ||
| Exterior-mounted gutters, 26 | ||
| Downspouts, 28 | ||
| Checkpoint summary, 29 | ||
| 4 | Paved areas around the structure, 31 | |
| Sidewalks, 31 | ||
| Street-level/driveway-level steps, 31 | ||
| Front and side paths, 32 | ||
| Entry steps, 32 | ||
| Patio, 33 | ||
| Driveway, 33 | ||
| Checkpoint summary, 35 | ||
| 5 | Walls, windows, and doors, 36 | |
| Exterior walls, 37 | ||
| Exterior siding, 38 | ||
| Masonry wall, 45 | ||
| Trim, 45 | ||
| Windows, 46 | ||
| Inspection, 48 | ||
| Exterior doors, 49 | ||
| Storm windows, screens, and storm doors, 51 | ||
| Storm windows, 51 | ||
| Screens, 51 | ||
| Storm doors, 52 | ||
| Inspection, 52 | ||
| Caulking, 52 | ||
| Checkpoint summary, 53 | ||
| 6 | Lotand landscaping, 55 | |
| Drainage, 55 | ||
| Groundwater, water table, 58 | ||
| Inspection, 60 | ||
| Retaining walls, 63 | ||
| Inspection, 64 | ||
| Landscaping, 65 | ||
| Lawn, 65 | ||
| Shrubs, 67 | ||
| Trees, 67 | ||
| Decks, 68 | ||
| Fences, 70 | ||
| Checkpoint summary, 71 | ||
| 7 | Garage, 73 | |
| Attached garage, 73 | ||
| Fire and health hazards, 73 | ||
| Plumbing check, 75 | ||
| Flood potential, 76 | ||
| Doors, 76 | ||
| General considerations, 77 | ||
| Detached garage, 77 | ||
| Exterior, 78 | ||
| Interior, 78 | ||
| Heat and electricity, 80 | ||
| Checkpoint summary, 80 | ||
| 8 | Wood-destroying insects and rot, 82 | |
| Termites, 82 | ||
| Subterranean termites, 85 | ||
| Dry-wood termites, 91 | ||
| Formosan termites, 92 | ||
| Other wood-destroying insects, 92 | ||
| Carpenter ants, 92 | ||
| Powder-post beetles, 94 | ||
| Rot, 95 | ||
| Inspection, 97 | ||
| Checkpoint summary, 97 | ||
| INTERIOR INSPECTION |
||
| 9 | Attic, 99 | |
| Insulation, 99 | ||
| Violations, 101 | ||
| Leakage, 101 | ||
| Fire hazards, 102 | ||
| Ventilation, 103 | ||
| Attic fans, 105 | ||
| Structural, 105 | ||
| Checkpoint summary, 105 | ||
| 10 | Interior rooms, 107 | |
| Walls and ceilings, 108 | ||
| Floors, 111 | ||
| Heat, 112 | ||
| Windows, 112 | ||
| Electrical outlets, 114 | ||
| Fireplace, 115 | ||
| Bedrooms, 116 | ||
| Bathrooms, 117 | ||
| Water pressure and flow, 118 | ||
| Kitchen, 121 | ||
| Hallway and staircase, 121 | ||
| Checkpoint summary, 122 | ||
| 11 | Basement and crawl space, 125 | |
| Foundation, 125 | ||
| Settlement, 126 | ||
| Inspection, 127 | ||
| Dampness, 131 | ||
| Water seepage-causes and control, 132 | ||
| High groundwater level, 132 | ||
| Hydrostatic pressure-walls, 133 | ||
| Inspection, 134 | ||
| Furnace room, 140 | ||
| Ventilation, 141 | ||
| Crawl space, 142 | ||
| Checkpoint summary, 144 | ||
| ELECTROMECHANICALS | ||
| 12 | Electrical system, 146 | |
| Inlet electrical service, 146 | ||
| Electrical capacity, 147 | ||
| Fuses and circuit breakers, 150 | ||
| Inlet service panel box, 151 | ||
| Panel-box interior, 151 | ||
| Aluminum wiring, 152 | ||
| Grounding, 152 | ||
| Improper ground connections, 152 | ||
| Interior electrical inspection, 153 | ||
| Electrical outlets, 153 | ||
| Knob-and-tube wiring, 155 | ||
| Low-voltage switching systems, 155 | ||
| Violations, 156 | ||
| Checkpoint summary, 156 | ||
| 13 | Plumbing, 158 | |
| Water supply and distribution, 159 | ||
| Fixtures, 159 | ||
| Drainage system, 159 | ||
| Waste-disposal system, 161 | ||
| Cesspool, 162 | ||
| Septic system, 162 | ||
| Exterior inspection, 165 | ||
| Vent stack, 165 | ||
| Fresh-air vent, 166 | ||
| Lawn sprinkler systems, 166 | ||
| Septic system, 166 | ||
| Interior inspection, 167 | ||
| Fixtures, 167 | ||
| Water pressure, flow, 167 | ||
| Plumbing wall hatch, 168 | ||
| Pipes, 168 | ||
| Basement inspection 169 | ||
| Water-supply pipes, 169 | ||
| Distribution piping, 171 | ||
| Drainage pipes, 172 | ||
| Well-pumping systems, 174 | ||
| Wells, 174 | ||
| Well pumps, 174 | ||
| Accessory equipment, 176 | ||
| General considerations, 178 | ||
| Checkpoint summary, 179 | ||
| 14 | Heating systems I, 181 | |
| Central heating systems, 182 | ||
| Heating outlets: registers and radiators, 183 | ||
| Thermostat and master shutoff, 183 | ||
| Warm-air systems, 184 | ||
| Advantages, 185 | ||
| Disadvantages, 185 | ||
| Gravity warm air, 185 | ||
| Forced warm air, 187 | ||
| Heat pump, 190 | ||
| Hot-water systems, 190 | ||
| Gravity hot water, 191 | ||
| Forced hot water, 192 | ||
| Steam heating systems, 199 | ||
| Distribution piping, 199 | ||
| Controls, 200 | ||
| Domestic water heater, 202 | ||
| Advantages and disadvantages, 202 | ||
| Hybrid heating systems, 202 | ||
| Steam-hot water, 202 | ||
| Hot water-warm air, 203 | ||
| 15 | Heating systems II, 204 | |
| Oil-fired systems, 204 | ||
| Gas-fired systems, 206 | ||
| Electrical systems, 207 | ||
| Area heaters, 207 | ||
| Gas-fired units, 207 | ||
| Electrical units, 208 | ||
| Heating system inspection procedure, 208 | ||
| Warm-air systems, 210 | ||
| Hot-water systems, 212 | ||
| Steam systems, 213 | ||
| Oil burners, 214 | ||
| Gas burners, 214 | ||
| Checkpoint summary, 215 | ||
| 16 | Domestic water heaters, 218 | |
| Tank water heaters, 219 | ||
| Reversed connection, 219 | ||
| Relief valve, 220 | ||
| Rumbling noise, 222 | ||
| Exhaust stack, 222 | ||
| Operational inspection, 223 | ||
| Water heater replacement, 224 | ||
| Water heater capacity and recovery, 225 | ||
| Tankless coil water heaters, 226 | ||
| Inspection procedure, 228 | ||
| Indirect-fired storage water heaters, 228 | ||
| Checkpoint summary, 229 | ||
| 17 | Air-conditioning, 230 | |
| Air-conditioning capacity, 231 | ||
| Air-conditioning systems, 232 | ||
| Integral system, 232 | ||
| Split system, 232 | ||
| Heat pump, 240 | ||
| Evaporative cooler, 241 | ||
| Checkpoint summary, 241 | ||
| 18 | Swimming pools, 243 | |
| Concrete pools, 243 | ||
| Vinyl-lined pools, 244 | ||
| Preformed fiberglass pools, 245 | ||
| Pool equipment, 246 | ||
| Pool accessories, 248 | ||
| Inspection procedure, 248 | ||
| Checkpoint summary, 250 | ||
| OTHER ISSUES | ||
| 19 | Energy considerations, 251 | |
| Energy audit, 251 | ||
| Insulation, 252 | ||
| Attic ventilation, 255 | ||
| Storm windows, 256 | ||
| Caulking and weatherstripping, 257 | ||
| Fireplaces and wood-burning stoves, 257 | ||
| Heating and air-conditioning systems, 258 | ||
| 20 | Environmental concerns, 260 | |
| Radon, 260 | ||
| Asbestos, 263 | ||
| Drinking water, 265 | ||
| Lead, 266 | ||
| Formaldehyde, 268 | ||
| Leaky oil tanks, 268 | ||
| Electromagnetic fields, 269 | ||
| Mold, 270 | ||
| 21 | Conclusion, 272 | |
| Professional home inspection, 272 | ||
| Home inspection limitations, 272 | ||
| Real estate warranty program, 273 | ||
| Private home inspection warranty programs, 274 | ||
| Manufacturers' warranties, 274 | ||
| Contract, 274 | ||
| Glossary, 276 | ||
| Inspection worksheets, 278 | ||
| Index, 285 | ||
1
Tools and procedure
-
Tools needed 1
Inspection procedure 2
Exterior inspection 2
Interior inspection 3
Electromechanical systems 4
Final inspection 4
The inspection procedure outlined in this book is similar to the one that I use when inspecting residential structures. Because the various components of homes are basically the same, this procedure is valid regardless of the geographic location of the structure. It has been used on homes of all ages, from newly constructed to pre-Revolutionary, from vacation homes to stately mansions.
Tools needed
To inspect the house properly, you will need the following tools: a flashlight, to see in dark places (and you'll be surprised what you might find); a magnet, to determine whether plumbing pipes are iron; a marble, to note whether the floors are relatively level; an ice pick or screwdriver, to aid in looking for wood rot and termite infestation; a 6-foot stepladder, for those houses that do not provide direct access (built-in or pull-down steps) to the attic; an electrical tester, for checking the electrical ground connection, particularly in the kitchen and bathroom outlet receptacles; binoculars, to get a closer look at the roof and roof-mounted structures; and a compass, to determine the building's exposure. Knowledge of the exposure is helpful in evaluating the condition of various structural elements and components.
Since the first edition was published, a number of electronic tools have come on the market that are being used by professional home inspectors. The one tool that I would recommend for homeowners and home buyers is a battery-operated moisture meter that checks for water leaks without damaging the surface being tested. One manufacturer of moisture meters is Delmhorst Instrument Co. They can be reached at (800) 222-0638 for information on purchasing a meter.
When performing the inspection, you should wear old clothes. Areas such as unfinished attics, basements, and crawl spaces are often quite dusty. The last items you need for inspection are a pencil and inspection worksheets. The worksheets are provided in the back of this book and should be completed as you perform the inspection. Later, you can use these worksheets to evaluate the true condition of the house and base your decision on facts rather than emotion.
Inspection procedure
A house, no matter how large or imposing, can be easily inspected if it is divided into its component parts, such as the exterior, interior, and electromechanical systems. The exterior and interior portions can be further subdivided. By approaching the inspection in a systematic order and using the worksheets provided as a guide, all the items of any consequence will be checked.
When driving up to the house, take a moment to notice the overall topography or shape of the land. Often, the topography in the immediate vicinity of the house is level; however, the overall topography might be inclined. Consequently, the possibility exists of subsurface water movement in the direction of the house. When you see inclined topography in the general area of the house, you should be alerted to the possibility of some water seepage into the lower level of the structure.
The exterior of the building should be inspected before the interior. This order is important because it provides you with an overall view of the structure that in turn can reveal the cause for some interior problems. Specifically, water seepage into a lower level can be the result of faulty gutters or downspouts, or improper grading (the ground immediately adjacent to the house slopes toward the house rather than away). A faulty roof can manifest itself in water stains one or two levels below the roof. Cracked and open exterior joints can allow the entry of water, which you will note as cosmetic damage to interior portions of the structure.
Exterior inspection
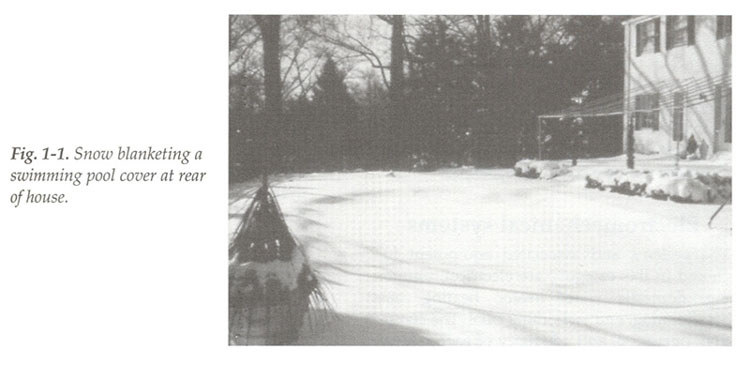
Before you start the exterior inspection, stand in front of the house and take a compass reading. The exposure for all four sides of the building should be marked on the worksheet (i.e., Front exposure-southerly; Right exposure-easterly, etc.). The exterior inspection is performed while walking around the house twice. The first time, you should look at the roof, gutters, chimney, vent stack, and anything else that is roof-mounted. The details of what to look for and how to inspect the various components of the house are discussed in the chapters that follow. During this first pass around the house, use binoculars so that you can get a closer view of the items on the upper portion of the structure. The binoculars should not have a magnification greater than 8X (eight times actual size). A more powerful binocular will tend to exaggerate hand movement, making it difficult to see details. The slightest hand movement will cause a blurred image. After the first pass, the condition of those items inspected should be noted on the worksheet. If your first pass around the house is in the winter just after a snow, be careful where you walk. There may be a swimming pool behind the house that is covered over with snow. If you are concentrating on the house, the pool may not be that obvious and you might step right into it. (See FIG 1-1.)
During the second pass, you look for many types of problems. Start at the front of the house and look at all the items that are either on the front of the structure or in the front yard. Examples of these items are paths, entry steps, exterior wall siding, windows, doors, decks, landscaping, fence, and so on. All of the items normally encountered during an inspection are discussed in detail in the following chapters. You should be concerned only with those items that apply to the house you are inspecting.
After inspecting the front of the house, apply the same technique to the left side, the rear, and the right side of the building. If any items of a suspicious nature require further investigation on the interior of the structure, make a note on the worksheet as a reminder. For example, if an elbow is missing from one of the downspouts and no splash plate on the ground deflects the effluent from the down-
spout away from the building, you should check for water seepage from that area into the lower level of the structure. Noting this fact on your worksheet helps you remember to check the interior wall opposite the downspout for sings of water seepage.
After going around the building the second time, you should be finished with the exterior inspection. Double-check your worksheet to see if you've recorded the condition of all the items inspected. At this point, you should inspect the garage. After the garage inspection, you are ready for the inside of the house.
Interior inspection
Enter the house through the front door. Try the doorbell to make sure it is operational. It's important to remember that you are looking at a house you are interested in buying. If all goes well, this will be your home, so don't be shy or feel embarrassed about doing things that any homeowner would do. As part of the inspection, you should open and close faucets on sinks, tubs, and showers; flush toilets; open and shut doors and windows; turn on the heating system and air-conditioning system by means of the thermostats; feel the airflow from heat/cooling registers; see if radiators get warm; and turn switches controlling lights and fans on and off.
Start the interior inspection at the uppermost portion of the building. If the house has an attic, that's where you start. To inspect the attic, you might need your ladder-check with the owner. Some homes don't have an attic, so begin this portion of the inspection with the rooms directly below the roof.
After the attic inspection, check all of the rooms on the level directly below. In some large homes you can easily miss a room. To avoid overlooking any rooms or items, begin your inspection at the entry to that level. If you start at the entry and walk either clockwise or counterclockwise, looking at each room in order, you will return to your starting point and will have inspected all of the rooms. However, if you jump around from one side to another, you can easily overlook a room or two. Again, there is no substitute for good procedure.
After all the rooms on one level have been checked, proceed to the next lower level, inspecting the connecting staircase along the way. Check all the rooms on this level in the same manner. After all the finished rooms have been checked, inspect any unfinished areas such as the basement and crawl space. This is the end of the interior inspection. At this point, all the rooms, halls, and staircases throughout the house have been checked. To complete the home inspection, you must now check the electromechanical systems.
Electromechanical systems
The systems and associated equipment included in this category are electrical, plumbing, domestic water heater, heating, air-conditioning, and swimming pool. The condition, operation, and adequacy of each system in your house must be checked as described in its respective chapter and recorded on the worksheet.
This final check concludes your home inspection. You have now looked at every item in the house of any consequence and should have recorded on the worksheets all problems and deficiencies. Some of the problems you uncover might require the services of a professional for further investigation. All situations requiring the services of a professional are indicated in the chapters that follow.
Also, after the physical inspection, you might want to have certain tests performed to determine whether the house has environmental problems, such as a high radon concentration, contaminated well water, a leaking buried fuel-oil tank, or a mold buildup.
Look at your worksheet and test results and try to evaluate the major problems. Do not expect a perfect house. You will always find minor problems, and the costs for correcting these problems should not concern you. However, if you find many minor problems, the costs for correction can be significant.
Of main concern from a cost point of view are major problems, some of which are defined as follows:- The need for structural rehabilitation to the foundation
- The need for re-siding the exterior walls
- Water penetration into the basement or lower level
- A malfunctioning or obsolete heating system
- The need for repiping the plumbing system
- The need for a new roof
- A malfunctioning air-conditioning system
- Inadequate electrical service
- Termite infestation
- The need for complete rehabilitation to
- paved areas
- deck
- detached garage
- retaining walls
- Environmental problems
Final inspection
On the day of, but prior to, the contract closing, you should take one final walk through the house and look at the walls, windows, doors, and plumbing fixtures for cracked and broken sections. Sometimes damage occurs when the seller's furniture is being moved out or through vandalism when the house is left vacant for a period of time. Specifically, look for physical changes that occurred between the time of the contract signing and the closing.
During your walk-through, check the operation of the electrical, plumbing, and heating systems. The central air-conditioning system and swimming pool equipment should also be checked if the weather permits. Check the operation of all the appliances that are considered part of the purchase. If any appliances or electromechanical systems are malfunctioning, list them on a sheet of paper, along with any items that have been badly damaged since the contract signing. This list should be taken to the closing and discussed with the seller. Very often, dollar adjustments are made to compensate for the cost of repairs.
| Is that home or condominium apartment you plan on buying a true bargain or an overpriced "Handyman's special"? | ||||
 |
No other book on the market increases your chances more of getting your
money's worth when buying a home than The Complete Book of Home Inspection.
If you want to find out exactly what's behind, beneath, above, and around the home you're thinking of making an offer on, this is just what the inspector ordered. And if you're thinking of selling your home, here's the perfect way to accurately evaluate its condition prior to setting a price. This comprehensive instruction manual covers every aspect of exterior, interior, and electromechanical home inspection and is basic enough for a layperson and detailed enough to be a working on-site tool for professional home inspectors. Revealing techniques and methods used by experienced home inspectors, this heavily illustrated reference details how to evaluate the condition of a home or condominium apartment - inside and out. Precise step-by-step procedures enable you to inspect a home as though accompanied by an inspector with many years' experience. Written by a professional home inspector, The Complete Book of Home Inspection is packed with photos, graphs, dozens of checklists, and worksheets and valuable chapter summaries. If you want to avoid costly mistakes and headaches down the road, don't even think of making an offer on a house without reading this book first! |
|||
| NEW TO THIS EDITION: | ||||
 |
A new chapter on swimming pools |
|||
|
An added section on exterior walls discussing problems with synthetic stucco (EIFS) | |||
|
New material added to the environmental concerns chapter on molds and associated problems |
|||
|
Most chapters and sections have been extensively updated and expanded |
|||