
Estimating Excavation eBook (PDF)
How to calculate the amount of dirt you'll have to move and the cost of owning and operating the machines you'll do it with.
Detailed, step-by-step instructions on how to assign bid prices to each part of the job, including labor and equipment costs. Also, the best ways to set up an organized and logical estimating system, take off from contour maps, estimate quantities in irregular areas, and figure your overhead.
This e-Book is the download version of the book in text searchable, PDF format. Craftsman eBooks are for use in the freely distributed Adobe Reader and are compatible with Reader 5.0 or above. Get Adobe Reader.
| Weight | 0.000000 |
|---|---|
| ISBN | 0-934041-96-2 |
| Page Count | 448 |
| Author | Deryl Burch |
| Publisher | Craftsman Book Company |
Estimating Excavation
by Deryl Burch
- Contents
- 1
Get Started Right, 5
-
Why calculate quantities? 6
- Reading plans and specifications, 8
- Accuracy is essential, 10
- Record keeping, 14
- Reading plans and specifications, 8
- 2
The Site Visit, 17
-
Review the plans first, 17
- Make the visit productive, 18
- Site visit for a sample project, 24
- Make the visit productive, 18
- 3
Properties of Soils, 31
-
Soil testing, 31
- Soil classifications, 31
- Soil characteristics, 34
- Soil classifications, 31
- 4
Area Take-off by Plan and
Profile, 41
-
Cut and fill sections, 42
- Understanding surveys, 43
- End area calculations, 47
- Calculating the volume, 54
- Understanding surveys, 43
- 5
Reading Contour Maps, 61
-
Planimetric and topographic
maps, 61
- Understanding contour lines, 62
- Locating unmarked points, 66
- Monuments and bench marks, 67
- Understanding contour lines, 62
- 6
Area Take-off from a Topo Map,
71
-
Comparing the contour lines, 71
- Estimating with a grid system, 72
- Doing the take-off, 75
- Calculating cut and fill areas, 80
- Using worksheets in a take-off, 85
- Shortcuts for calculating quantities, 91
- The equal depth contour method, 99
- Estimating with a grid system, 72
- 7
Irregular Regions & Cold
Areas, 103
-
Finding area using compensating
lines, 104
- Finding volume using total area and average depth, 109
- Using compensating lines with a coordinate system, 110
- Using the trapezoidal rule, 117
- Finding volume using total area and average depth, 109
- 8
Using Shrink & Swell
Factors, 127
-
Soil states and their units of
measure, 127
- Using shrink/swell factors in earthwork estimates, 128
- Estimating the number of haul trips, 130
- Using material weights to customize shrink/swell factors, 131
- Using soil weights to calculate equipment load factors, 131
- Pay yards, 133
- Using shrink/swell factors in earthwork estimates, 128
- 9
Topsoil, Slopes & Ditches, 135
-
Dealing with topsoil, 135
- Calculating net volumes for earthwork 139
- Slopes and slope lines, 142
- Estimating trenches, 147
- Calculating net volumes for earthwork 139
- 10
Basements, Footings, 155
-
Grade Beams & Piers, 155
- Estimating basement excavation quantities, 155
- Finding volume - outside basement walls, 157
- Calculating the total volume for basement excavation, 164
- Sample basement estimate, 170
- Estimating ramps, 175
- Grade beams and piers, 178
- Estimating basement excavation quantities, 155
- 11
All About Spoil and Borrow, 181
-
Underlying costs of spoil and
borrow, 181
- Spoil and borrow volume calculations, 183
- Calculating the volume of a stockpile, 184
- Finding the volume for a stockpile of unknown height, 186
- Calculating volume for a stockpile of set area, 190
- Spoil and borrow volume calculations, 183
- 12
Balance Points, Centers of Mass & Haul Distances, 195
-
Balance points to an excavation
estimator, 195
- Balance points to an engineer, 196
- Reducing haul distances, 197
- Calculating -haul distances, 200
- Balance points to an engineer, 196
- 13
Earthmoving Equipment: Productivity Rates and
-
Owning & Operating Costs,
209
- Machine power, 210
- Machine speed, 214
- Machine production, 218
- Productivity calculations for a simple dirt job, 221
- Owning and operating costs, 230
- Calculating the overhead, 234
- Adding the profit, 237
- Bid price per cubic yard, 237
- Machine power, 210
- 14
A Sample Take-off, 239
-
General specifications, 240
- Doing the take-off, 242
- 15
Costs and Final Bid for
the Sample Estimate, 335
-
The bid preparation process, 336
- Overhead, 340
- Machine selection, 340
- Overhead, 340
- Blank
Worksheets, 434
- Grid square area and volume, 435
- Grid take-off - existing contour, 436
- Grid take-off - proposed contour, 437
- Grid square calculation sheet, 438
- Cut and fill prism calculations, 439
- Quantities take-off sheet, 440
- Grid take-off - existing contour, 436
- Index,
441
Estimating Excavation
by Deryl Burch
Chapter One
Get Started Right
Construction cost estimating is demanding work, no matter what type of construction is involved. But I think estimating earthwork is the hardest of all. Why? Two reasons. First, excavation has more variables and unknowns. You don't know what's down there until you start digging. Second, you have to rely on information from many sources - some of which may not be accurate.
That's why every earthwork estimator needs special skills:
- The ability to read plans and specifications
- An understanding of surveying and engineering practice
- A facility with mathematical calculations
- The ability to anticipate environmental and legal issues
- An abundance of good common sense.
If you can bring common sense to the task, this manual will show you how to do the rest.
I'll help you develop all the skills every good earthwork estimator needs. Of course, I can't cover everything on every type of job. But I'll include the information most earthwork estimators need on most jobs. Occasionally, you'll have a job that requires special consideration. But if you understand the principles I'll explain here, you should be able to handle anything but the most bizarre situations.
In this, the first chapter, I won't do much more than touch on a few important points you should understand:
- Why you have to estimate quantities
- The importance of plans and specs
- Working accurately
- Keeping good records
After making these points in this chapter, I'll describe a step-by-step estimating system, from making the site survey to writing up the final cost summary. I'll teach you a process for making consistently-accurate earthwork estimates. Part of this process is calculating the cubic yards to be moved.
That's the heart of every earthwork estimate. I'll cover quantity estimating in detail. Then I'll explain how to find labor and equipment costs per unit. We'll also consider soil and rock properties-and how the equipment you use affects bid prices.
Why Calculate Quantities?
In the past, many smaller dirt jobs were bid as a lump sum rather than by the cubic yard. Dirt contractors based their bids on guesses - what equipment was needed and how long should it take? They didn't bother estimating soil quantities. Making estimates this way overcame one problem: most excavation contractors didn't know how to estimate soil and rock quantities.
I think those days are over. Fuel and labor costs are too high now. And the competition is too intense. There's too much risk in "seat-of-the-pants" guesses. A few mistakes, a couple of surprises and you're going to be looking for some other type of work. Only the best survive for long in this business. Most of the survivors know how to make accurate bids by the cubic yard. Fortunately, making good quantity estimates isn't too hard if you've mastered a few simple skills. I hope that's why you're reading this page.
I've found that good earthwork estimators are good at calculating earthwork quantities. Here's why:
First, no one's going to do it for you. You have to do it yourself or it's not going to get done. Many engineers, architects, and even some builders know how to figure soil and rock quantities. But few take the trouble to do it. Instead, they depend on you, the earthwork estimator, to do it.
Second, earthwork contractors who don't bid by the cubic yard usually end up in court. That can cripple any company. It's common for the actual amount of dirt moved to be more or less than expected. The best way to protect yourself is to bid by the cubic yard. If you have to move more dirt than the plans show, you'll get paid more. It's as simple as that.
Third, most owners, engineers and architects request excavation bids based on the cubic yards moved. That's now the accepted procedure for most projects, from single-family homes to roads and commercial jobs.
General and Special Quantities
If you agree that excavation bids should be based on quantity estimates, the next step should be obvious. We have to start every estimate by figuring the quantity of soil to be moved.
I recommend you start the estimate for any project, no matter how large or small, by dividing excavation quantities into two categories:
General quantities include any work where you can use motorized equipment such as scrapers, hoes and loaders at their designed production rate.
Special quantities include anything that requires special care or lower production rates. Examples are most rock excavation, nearly all hand excavation, backhoe work around sewer lines, underground utilities, or existing structures. Naturally, prices for special quantities are higher than prices for general quantities.
Keeping these two quantities separate protects you. Most excavation contracts have a clause that covers extra work. Unanticipated rock deposits, special soil problems and unusual trenching problems are extra work that you should be paid extra for. If you've bid a higher price for special quantities, you'll get paid at that price per cubic yard for the additional work. Otherwise you could end up chipping out rock at the price of moving sand.
Calculating Cubic Yard Cost
Here's the basic formula for costs per cubic yard:
Labor and equipment cost per hour multiplied by the hours needed to complete the work, divided by the cubic yards of material to be moved.
Does that seem simple? It's not. You may know your hourly labor and equipment costs right down to the last penny. But estimating the time needed is never easy. And calculating volumes for sloping and irregular surfaces is demanding work.
Notice several things about the formula for computing costs per cubic yard. First, it's based on labor and equipment costs for your business. That's important and I'll have more to say about it later.
Second, it assumes you know the quantity of soil or rock to be moved. That's going to take some figuring.
Third, even after you've calculated the cost per hour and quantity of soil, you're not finished. You need to estimate the time needed. Usually that's the hardest part. To do it, you have to decide on the equipment (method) to use.
Of course, the quantity of material (yardage) is a very important part of our cost formula. But the excavation method (type of equipment) also has a major influence on cost. The most expensive equipment (cost per hour) will usually be the most productive (move soil at the lowest cost). But the machine with the largest capacity isn't always the best choice for every outhaul. I'll explain why later. For now, just understand that making good equipment selections will help reduce costs.
Reading Plans and Specifications
Nearly every significant excavation project that's let out for bid will be based on a set of plans. Plans are scale drawings that show the finished project. Plans are supplemented with written descriptions called specifications (specs for short). Specs explain in words what the plans can't or don't show. Ideally, the plans and specs, read together, should answer every question about the job. They shouldn't leave anything unclear or subject to interpretation. The better the job done by the engineer or designer, the more likely the plans will be clear and complete.
Plan reading is an important skill for every earthwork estimator. But this isn't a book on plan reading. If you need help with reading plans, if you don't understand the plans and drawings in this manual, pay a visit to your local library. They'll probably have several basic plan-reading texts to choose from.
As an excavation estimator, you're expected to understand every detail in the plans and specs for the jobs you bid. That's why they're worth careful study. Read these documents completely. Note everything that affects your excavation work. Some engineers and architects aren't very well organized. They may put instructions and notes almost anywhere on the plans. Read every page carefully, regardless of what you think it's about.
Pay particular attention to notes that spell out the contractor's responsibility. For example, you may find a note somewhere on plans that relieves the engineer or architect of responsibility for damage to utility lines. The note probably says:
NOTE: While every precaution has been taken to show existing utilities in their proper location, it is the contractor's responsibility to determine their actual location. No assumption should be made that no other utility lines fall within the limits of construction.
If you suspect utility lines may be a problem, ask the utility companies to locate their lines for you. Most will be happy to do that at no cost. But they may want ample advance notice.
Also pay attention to notes on natural obstacles (such as rock) or anything that's buried on the site. Is there an abandoned underground storage tank or old basement in the area to be excavated? The plans may also mention drainage problems and unsuitable soil deposits, probably in the cross-section drawings or special provisions of the specs.
Search the plans and specs for everything that may affect cost. That's always your starting place. But it's not the end of your search. Many cost items won't show up in either the plans or specs. For example, you'll have to find out from the city or county building department what permits will he required. Also, city, county or federal law may set minimums for wages, employee benefits and insurance coverage.
Here's another pitfall to watch for: Who pays to have the project staked out by a surveyor or engineer? In most cases, the designer will pay for surveying - the first time. If you knock over any survey stakes during actual work, you'll probably have to replace them at your own expense. Work as carefully around the stakes as possible. But if job layout makes it impossible to avoid moving stakes, allow enough in your bid to pay for another survey.
Make sure you understand how you'll be paid. On larger projects, you're usually paid per cubic yard, based on the difference between the original soil cross section and the cross section when work is finished. We'll talk more about cross sections later in this book.
On many smaller projects, your payment may be based on the engineer's estimate of yardage. If that's the case, look for a provision in the specs that gives you an option to have final cross sections made at your own expense. Experience will help you decide if a final set of cross sections is to your advantage. But I recommend that you always take off quantities yourself. Don't assume the plans are right. Anyone can make a mistake, but you could end up paying the price.
Undercutting
Undercutting is removing additional dirt from an area below the finished grade line. There are several situations where this is necessary. The most common is where a rock ledge is close to, but not above, the finished grade line. Figure 1-1 shows a typical situation. Most structures can't be built directly on rock. If the rock weren't there, you would excavate just to the finished grade line and be done. Because the rock is just below finished grade, you have to cut deeper. That's the undercut. Then you have to backfill with suitable material such as compacted dirt. The dirt provides a buffer between the rock and the foundation.
Figure 1-1
Undercutting for Rock
There's probably nothing in the specifications that gives you the right to collect for undercutting and backfill. But it's expensive work and the cost shouldn't come out of your pocket. Where undercutting may be necessary, include it in your bid item per cubic yard cut.
Undercutting is also needed for underground utilities such as storm drains and sanitary sewer lines. Most plans will show only a designated flow line elevation. Based on the plans and judgment, you'll have to decide how much and what type of bedding to install below the pipe. Each cubic yard of bedding requires a cubic yard of undercutting. Figure 1-2 shows an example. Undercutting may also be required on roads, parking lots and sidewalks anywhere there's a load on the soil.
Overfilling is the opposite of undercutting. When backfilling a large area, you can usually bring the backfill right to grade without doing any cutting away of excess backfill. But in a small area, it's usually easier to bring the area above the final grade line by 2 to 4 inches, then cut off the excess. This is still called undercutting. Of course, you can't expect to get paid for removing the 2- to 4-inch excess. But it's still a cost of the job.
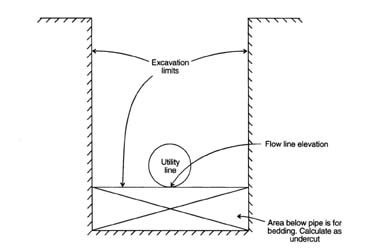
Figure 1-2
Undercutting for Pipe Bedding
Accuracy Is Essential
Accuracy is the essence of estimating. If you can't work accurately, you're in the wrong business. But don't get me wrong. I don't mean that we're going to account for every spadeful of soil on every estimate. There are times when you can ignore small differences in elevation. On most jobs these small plus and minus areas will average out to almost nothing. But a 1-inch mistake in elevation over the whole job can cost you thousands of dollars. Even 1/16-inch error over a few acres can hurt you.
Here's an example. Assume you're bringing in fill on a city lot that measures 125 feet by 150 feet. Because of a mistake in grade, your estimate of imported soil is wrong. It leaves the entire site 1 inch below the specified finished grade. How much more soil is needed to correct the 1-inch mistake?
Here's the formula for volume:
Volume (in cubic feet) = length (in feet) x width (in feet) x depth (in feet)
In this example, you know the length and width in feet but the depth is 1 inch. To use the formula, convert 1 inch to a decimal part of a foot. You can either refer to the conversion chart (see Figure 1-3) or divide 1 by 12, since 1" = 1/12'. Either way, 1 inch equals 0.0833 feet.
Now you're ready to use the formula for volume:
Volume (CF) = 125 x 150 x 0.083
= 1,556.25
How many cubic yards is that? Since there are 27 cubic feet in a cubic yard, divide the cubic feet by 27:
Volume (CY) = 1,556.25/27
= 57.6 CY
Trucking in almost 58 cubic yards of soil won't be cheap. If imported soil costs you $25 a cubic yard, your 1-inch mistake is a $1,450 error. That could make the difference between profit and loss on this job.
Figure 1-3
Inches to Decimal Feet Conversion Chart
| Inches | Decimal Feet | Inches | Decimal Feet |
| 1/16 | 0.0052 | 7/8 | 0.0729 |
| 1/8 | 0.0104 | 15/16 | 0.0781 |
| 3/16 | 0.0156 | 1 | 0.0833 |
| 1/4 | 0.0208 | 2 | 0.1667 |
| 5/16 | 0.0260 | 3 | 0.2500 |
| 3/8 | 0.0313 | 4 | 0.3333 |
| 7/16 | 0.0365 | 5 | 0.4167 |
| 1/2 | 0.0417 | 6 | 0.5000 |
| 9/16 | 0.0469 | 7 | 0.5833 |
| 5/8 | 0.0521 | 8 | 0.6667 |
| 11/16 | 0.0573 | 9 | 0.7500 |
| 3/4 | 0.0625 | 10 | 0.8333 |
| 13/16 | 0.0677 | 11 | 0.9167 |
Your Estimating Procedure
The more organized and logical your estimating procedure, the more accurate your estimates will be. If you have the tools, papers and information you need close at hand, you're off to a good start. Then you can focus your attention and concentration on producing an accurate estimate. If you're cramped for space, uncomfortable, and trying to work without all the equipment and information you need, errors are almost inevitable.
Start by organizing an efficient work area. It should be large enough so you can lay out all the plans on a table and still have room to write and calculate. Provide enough light to make reading comfortable, and keep the work area free of shadows. This is especially important when working with transparent overlays or other light-duty paper where you might mistake shadows for lines.
A good calculator is a must. I recommend buying a calculator with both a digital and a paper printout. You need the printout to check your figures. Make sure you have an engineer's scale and drafting triangles for checking and drawing lines, a small magnifying glass, tape for holding overlays, and the normal collection of pencils, erasers, and paper.
Although it's not essential, I like using a light table. You can place a drawing on it, overlay it with another paper, and see through both of them. It's great for working with plan and profile sheets, or overlays on grid or take-off sheets.
Later in the book we'll talk about using a planimeter to take off quantities. Although it's relatively expensive, a good planimeter will soon pay for itself. Take care to select one that's sturdy and has all the needed instructions and attachments.
A computer is even more expensive, but more and more estimators are using one. There are programs on the market today that can handle anything from simple calculations to a complete estimating program, with cross sections, quantities and printouts. But no program can take the place of an estimator who understands estimating procedures and practices. That's the purpose of this book.
There are two advantages to using a computer. The first is time. That's an estimator's most valuable asset, and a computer can help make your time more productive. Second, a computer makes it easier to keep cost figures for equipment and labor. Records from past projects and estimates can make current estimates more accurate.
If you don't currently have a computer, don't jump in without doing some research first. There are many computers on the market, tons of software, and hundreds of dealers. Take the time to make yourself familiar with the options. Talk to dealers. More important, talk to other estimators who use computers to do their estimating. Read trade magazines, especially the ads for estimating software. And don't go out and buy a computer and then look for estimating programs to run on it. First, choose the estimating program you like, and then buy the computer that will run that program. Otherwise, you may find the computer you bought won't run the program you like.
When you've got your work area and equipment set up to work efficiently, you're on the path to accurate estimates. To stay on the path, it's important to approach the work with a logical and organized procedure. That speeds up the work and reduces mistakes. Let me describe the method that works for me. I think it'll work for you, too.
When starting a project, first read all documents describing the job. Take notes on any situation that's not a normal work requirement. Are there utilities that must not be disturbed? Do the documents indicate specialized material types from log borings? Do they stipulate any arrangement for rock on the site? Look for any special provisions set out by the designer. Then head out for a field visit. That's the subject of the next chapter.
After returning from the field, review the documents again, looking for unusual situations that the site visit brought to your attention. Then make a complete written outline of all work that needs to be done in the order in which it will be performed. Set up files for each separate section. Make a list of additional data such as quad sheets, local conditions, and any other information you need to gather.
Here's the order I usually use.
- Consider any drainage, traffic or work zone protection work that needs to be done. Are there any on-site streams that must remain open, or roadways to maintain? These would probably be lump sum items, not items you'd take off quantities for. Just make sure you don't miss any of these special items.
- After studying the plans and the site, you should have a good idea if there's enough fill on the site, or if you'll need a borrow pit. Or will you need a place to put excess material off-site? Begin now to make arrangements for needed sites, sampling of material for approval by the engineer, and purchasing any material that's needed.
- Now consider the topsoil requirements. Review the material sample, the requirements for replacement, and availability of storage area on site. Calculate the amount of usable material and the amount of waste that must be disposed of.
- Will there be any special excavation, like rock work or the removal of existing structures or facilities? Make sure you include all work and any special equipment you'll need. Will you need to rent equipment? What about rock drills, blasting material, or cranes?
- Begin calculating the general quantities with the cut or fill work over the entire project. Start in the same place and proceed throughout the project the same way for every estimate. One way to make sure you cover all of the project is to set up a grid system with a corresponding file system. As you finish work in each grid, mark it off, file it, and move on to the next grid.
- Next, calculate all the utility lines, keeping the figures for each area separate. Be especially careful in estimating the tie-in between new and existing lines. Allow a little extra time for lines that aren't exactly where the plans show them to be.
- Then consider the roads, parking lots, and paved or special drainage ditches. Again, keep the quantities for each separate. One note of caution: Remember to consider the base and sub-base when figuring final elevations.
- Buildings, basements, sidewalks and other similar structures are next. After you've calculated each structure separately, add them all together to get a structure total.
- Finally, calculate the topsoil. And don't forget that if you've used a borrow pit, you may have to place topsoil there also.
- Now you're ready to start putting together all that information to come up with a realistic quantity total for the complete project. Fill out the final quantities sheet. Remember to attach all worksheets, scratch paper and calculator printouts so you can recheck your totals.
Now review your final sheet, looking for potential problem areas. If possible, have someone else check all your calculations and extensions. If that's not possible, set the estimate aside and go through it again a few days later. You'll have a fresh approach that may spot errors or omissions.
The last step is to go through all the documents and make sure they're in order. Then file them. Don't throw anything away - not even the scrap paper. Why are those records valuable? Keep reading.
Record Keeping
Once you've learned to read plans carefully and work accurately, there's still one more important step: record keeping.
Think of your estimates as accumulated wisdom. Treasure them. Keep them handy. Make sure they're easy to understand. They should show how each figure was developed. Why? There are at least four reasons:
First, planning the work is a big part of every estimator's job. You can't estimate any type of earthwork without making decisions about equipment. Once you've selected equipment for estimating purposes, document your choice on the estimate worksheets.
If your bid is accepted, you'll probably want to do the work with the same equipment assumed in the estimate. What if months have gone by and you can't remember how the figures were developed? You have to start selecting equipment and estimating costs all over again. If the equipment assumed in your estimate isn't the same as the equipment actually used, comparison of estimated and actual costs may be meaningless.
Second, you're going refer to most estimates many times over months or even years. You shouldn't have to guess about how each figure was developed. That wastes time and can exhaust your patience. I've seen estimators who should know better use the back of an envelope to figure special quantities. After entering the final cost, they usually discard the envelope. Later, if there's a question about the estimate, how can you verify the figures? They're gone!
Third, old estimates are invaluable when compiling new estimates. Every estimate (especially if you actually did the work) provides a frame of reference for future jobs - even if labor and equipment costs have changed.
Fourth, every estimator makes mistakes. That's no embarrassment. But repeating mistakes is both foolish and expensive. The best way to avoid repeating mistakes is to preserve every scrap of estimating evidence - in a neat, tidy, well-organized file. Make notes on what worked and what didn't. Review those estimates and notes when estimating similar jobs. Save everything. Someday you may want to write a book. I saved my notes and estimates and wrote a book. You're reading it.
Using Public Records
To the professional estimator, there's no such thing as too much cost information. Collect all the estimating data you can. It helps if you know where to look for it. I canvass city and county engineering departments, public works departments and maintenance departments for whatever information they can provide. They know about bid prices, soil conditions, abandoned streets, utility lines, sewer and water problems. Use the resources available from your city and county government.
Aerial maps at the county tax office and contour maps from the United States Geological Survey offer clues to possible water and soil problems.
There are USGS offices in most states. They're often located in the capitol, or in cities with universities. Check your local phone book or local engineering groups for the address of the nearest office. City, state and county highway departments will have information on soil problems they've found under highways in the area.
What If You Don't Have Plans?
Up to this point, we've assumed that you're bidding the job from plans and specs provided by an architect or engineer. But you may be asked to bid on a small job that wasn't designed by an engineer or architect. Then you'll have to create your own plan. It may also be up to you to determine quantities and prepare a contract.
In any case, always figure soil quantities and get a written contract on every job, large or small. The responsibilities and liabilities are all yours, so plan and execute your bid with care. Use the procedures and guidelines in this book even if there are no plans.
If the owner doesn't have a plan prepared by an architect or engineer, collect as much information as possible from the owner. Does he or she know of any soil problems at the site? Is it your responsibility to request the survey and staking? Are any permits needed? When should the job be completed? Where are the utility lines? What conditions might delay the work?
Whether the job is big or small, whether you've got no plan or a very complete plan prepared by the best engineering firm in the state, make a visit to the site part of your estimating procedure. That's important - important enough to be the subject of an entire chapter. And that's the next chapter in this book.
![]() Estimating
Excavation
Estimating
Excavation
by Deryl Burch
Estimating excavation is hard - don't let anyone tell you otherwise. First, you're dealing with material that's largely hidden from view. You don't know what's down there until you start digging. Second, you're dependent on costly machines that can break down at any time. Third, your production depends on the employees who operate the machines - employees whose performance can change from day to day - even hour to hour. But there are techniques you can use to minimize those risks - and maximize your chances of making a decent profit from any job you estimate.
That's the purpose of this manual. It shows you, in simple, easy-to-understand language, how to calculate the amount of dirt you'll have to move, the cost of owning and operating the machines you'll do it with, and finally, how to assign bid prices to each part of the job.
The heart of every earthwork estimate is calculating the cubic yards you'll have to move. This book covers quantity estimating in detail, then explains how to assign labor and equipment costs per yard:
- How to set up and use an organized and logical
- How to get the information you need estimating system from contour maps
- How to read plans and specs
- When you have to undercut
- Why a site visit is mandatory
- Dealing with irregular regions and odd areas
- How to assess accessibility and job difficulty
- Factors for estimating swell and shrinkage
- How soil characteristics can affect your estimate
- Balancing the job: spoil and borrow
- The best ways to evaluate subsurface conditions
- Calculating machine owning & operating costs
- Figuring your overhead
- The two common methods of estimating earthwork quantities
Of course, some of the quantity estimating methods are complex, but, using clear, detailed illustrations and examples, the author makes it easy to follow and duplicate his system. The book ends with a complete sample estimate, from the take-off to completing the bid sheet.
The Author:
Deryl Burch has worked over 25 years in the construction industry, starting out as a laborer learning on the jobsite and progressing until he was estimating jobs ranging from single-family homes to major highway and utility projects.
Besides being a partner and estimator in an engineering consulting company, he has prepared estimates and bid jobs for the firm of Howard, Needles, Tammen & Bergendorf, one of the largest construction consulting firms in the world; for the Missouri State Highway Department, for the City of Fayetteville, Arkansas, and for Marion County, Kansas.